


Creating an online course is a great way of monetizing your audience. You get to make a lot of money, while providing value that can change their lives to your audience. You already know that, but you’re probably asking yourself “how long will it take to create it?”.
The short answer is that it can take you anywhere between 3 to a few hundred hours of work to create an online course. For a simple mini course with just 3 or 4 videos and slides, it could take you only one day to create from A to Z. However, a complete course about a complex topic with multiple modules and lessons could take 8 weeks or more to complete.
At SchoolMaker, we provide hundreds of course creators a platform helping their students get better results, and we've asked them how much time it takes them to create an online course on average.
Here are the results we got:
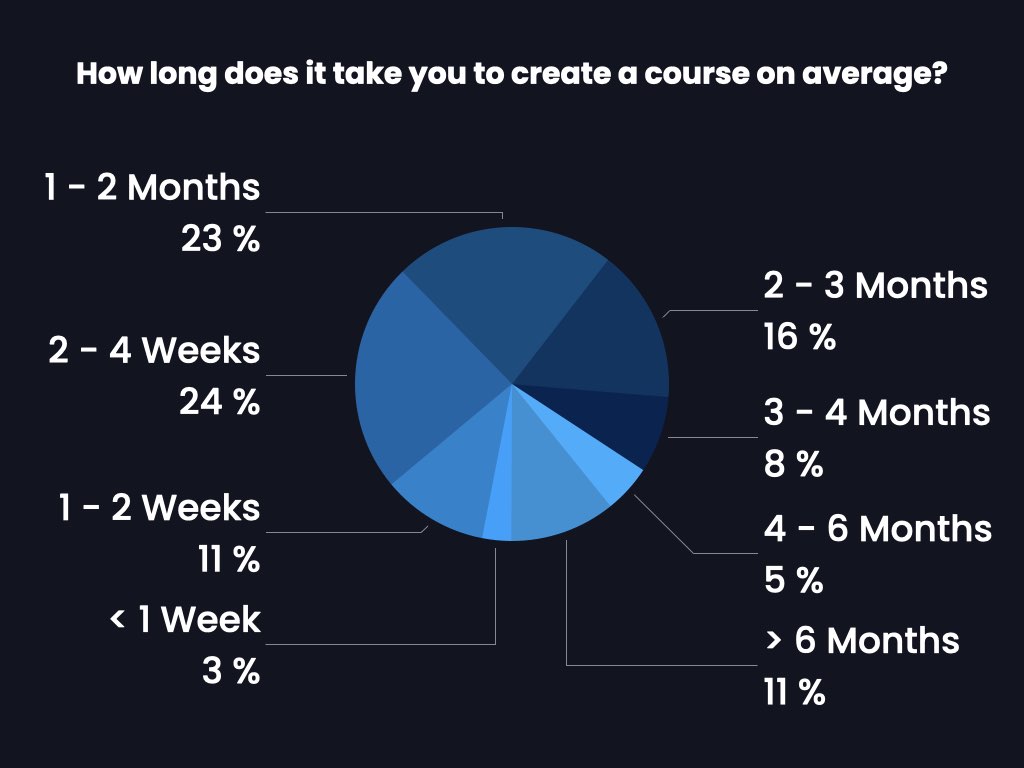
These numbers are examples to give you some context, but how long it will actually take you to make your course will depend on many different factors.
Let’s start by looking at these factors.
The factors that impact how much time it takes to create an online course
There are 5 main factors that can influence the production duration of a course:
1. How much experience you have as a course creator
This means that if you are creating your first online course, it’s probably going to take a bit longer to write, film and edit. But no worries, you can improve quickly with resources we created to help you improve as a course creator like our complete guide to course creation.

2. The type of videos that your course needs
Depending on what you are teaching, your course will require different formats of videos. For example, if you are making a course about a marketing topic, you might just need some slides and a webcam, or even your smartphone, which will make the filming and editing process easy because you need to only record a few things. However, if you want to teach a fitness, painting, or filmmaking program, recording and editing will probably take you more time.
3. The amount of resources that you need to provide
Unsurprisingly, the more resources your course needs, the more time it will take you to create it, but if you are a content creator, you can also choose to repackage things you have done in the past, which can save you time.

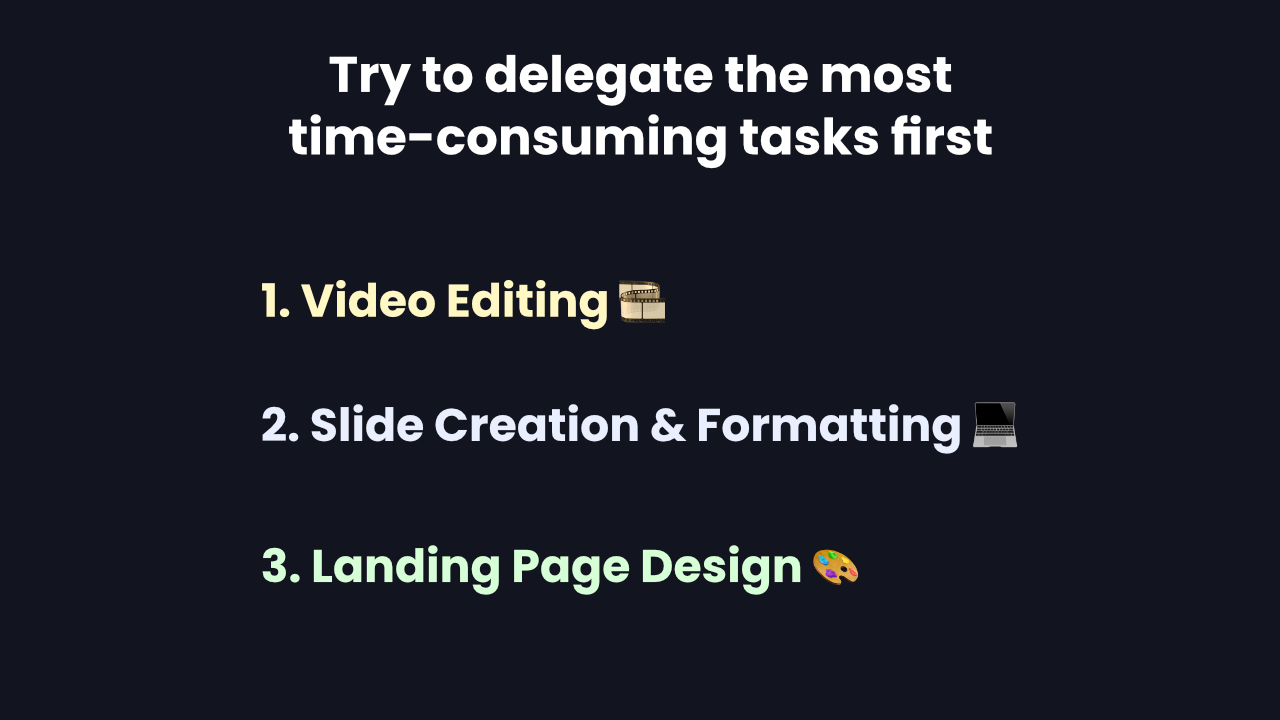
4. What tasks you choose to delegate
If you want to delegate, and you don’t have a team yet, you can use services like Fiverr or Upwork to work with freelancers at an affordable price.
Also, prioritize delegating the tasks in which you won’t bring any added value.
5. Your course size
And last but not least, the size of your course, which is the main factor that impacts the time it takes to create your online course, and can take a 2-week course to a 6-month one.
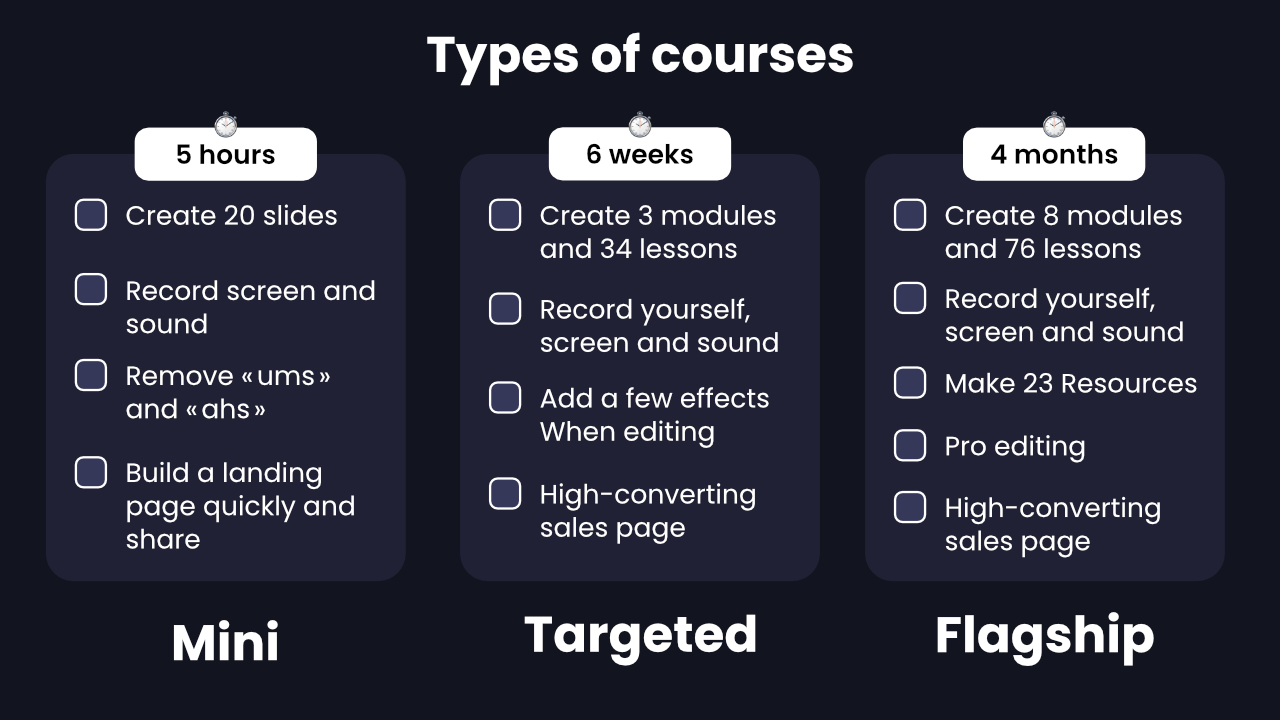
To keep it simple, I distilled 3 types of courses you might create:
- Mini courses, which can take from a few hours to up to 2 weeks to create, and are suitable for cheap products, lead magnets, freebies or bonuses.
For example, Everyone Can Build a Twitter Audience by Daniel Vassallo is a mini course.
- Targeted courses, which can take from a few weeks to 2 months to create, and are the most useful in my opinion as they are not too long to produce, but still generate a lot of income and can provide a great amount of value to your audience.
For example, SEO for Solopreneurs by Nat Eliason is a targeted course.
- Flagship courses, which can take from a few months to even a year to create! I personally do not recommend starting this kind of course if you are starting out, and you don’t have a team yet, but they can be extremely profitable if you have a big audience.
For example, Building a Second Brain by Tiago Forte is a Flagship course.
There is one thing that doesn’t change though, and that is the process of creating courses, which is the same regardless of the type of course you are making.
The process of creating an online course
There are 6 main steps when it comes to creating your course:
- Researching your course topic 🔎
- Writing and preparing course resources 🗃
- Recording 📷
- Video editing 🎞
- Publishing your lessons 🌐
- Promoting your course 📣
Let’s look at each step in detail, and give you a time estimate of how long each step takes.
Step 1: How long does it take to research and plan your course?
Research and planning is the first step when creating an online course, and it shouldn’t take you more than one or two days of work, regardless of the size of your course.
This step is important because planning and researching effectively will save you a lot of time.
How much time does it take:
- For a Mini course, it can take a few hours.
- For a Targeted course, it can take a day.
- For a Flagship course, it can take up to two days.
When researching and planning your course, your goal will be to do 5 things:
Define who you are going to help with your course
You probably already have a few online course ideas thanks to people in your audience who ask you questions, or because you saw other courses in your niche online.
But before jumping into your notes app to write your course outline, you need to define who your course is going to help as precisely as possible by creating an Ideal Student Persona (ISP).
An ISP is a fictional person representing a key segment of your audience which is more likely to buy a product from you.
Define what specific problem your course will solve
We usually recommend following the PURE acronym when finding problems to solve:
P → Painful, which makes your solution more valuable, and also encourages the student to put in the effort to solve it.
A painful problem is among the most important problems in their life. They complain about it all the time to their friends and family.
They might even wake up in the middle of the night thinking about it. It’s a “must have” and not a “nice to have”.
For example, ”It would be nice to have more money” is not a painful enough problem. But “I hate my job and I want to quit, so I really need to make money online” is a really painful problem.
U → Urgent which makes people take action quicker because they want to solve this problem now, not in the future.
For example, “I want to lose weight” is not very urgent. “I want to be in shape for my wedding, which is in 4 months!” is more urgent.
R → Recognized by people who want to buy your product online, which proves that enough people want to solve this problem.
To know if the problem is recognized, you can ask yourself if people will spend time and energy complaining about it. If they are already asking for advice, and are actively searching for solutions to it, then it’s a good sign!
E → Easy to solve by you because you have specific knowledge or experience.
It’s much easier to create and sell a solution to a problem you managed to solve, and have insider information about. Also, it has the added benefit of giving you more credibility.
When a course is solving a PURE problem, students are usually more motivated because the stakes are higher, which leads them to take more action and be more engaged.
.png)
Research your market
To get results faster, it’s better to have quick feedback loops, so spending weeks or months on market research isn’t an optimal strategy. Spending this much time on it can even become a form of procrastination, especially if you’re about to create your first course.
To keep it simple, you can simply:
- Identify popular content in your niche
- Run a survey to get feedback
Choosing the name of your course and your Unique Selling Proposition (USP)
Once you have chosen what problem to solve, you can focus on the name of your course and its USP.
The difference between a course name and a USP is that:
- A title is a memorable shortcut, and it can be vague and abstract like “Building a Second Brain”. Its 2 main purposes are to be memorable, and to be a hook for your USP.
- A USP is a complete and impactful sentence that promises the main outcome of your product to your potential customers.
Pricing your Solution
It’s impossible to find the perfect price from the get-go, but you can still get pretty close from perfect by looking at the 3 following things and decide what price to begin with:
- What are the prices like in your niche?
For example, business-oriented courses are generally more expensive than technical or creative courses because you can sell them as a program on which the student would have a return on their investment. - How much do alternative solutions cost?
For example, if you are doing a fitness course, what would be the price of a coach + a gym membership? - What are your competitors’ prices?
There are other courses about the same topic as you want to teach; what are their prices?
Step 2: How long does it take to prepare your course written contents?
Once you decide on the topic, you need to start coming up with content for your course. You will have to do research and find resources that will help you teach your students about your topic, and also use your past experiences with what you are teaching.
You will also need to create slides for your students, so they can be more engaged and be visually stimulated.
How much time does it take:
- For a Mini course, it can take a few hours to a few days.
- For a Targeted course, it can take up to a few weeks.
- For a Flagship course, it can take up to a few months.
To write your course contents, you will have to:
Structure your course
Effective online courses are action-oriented, so we should have an action to do at the end of each lesson like completing a template, a task, a quiz, or answering a question.
So if we use this approach and we zoom out of an online course, we see that it is divided into these parts:
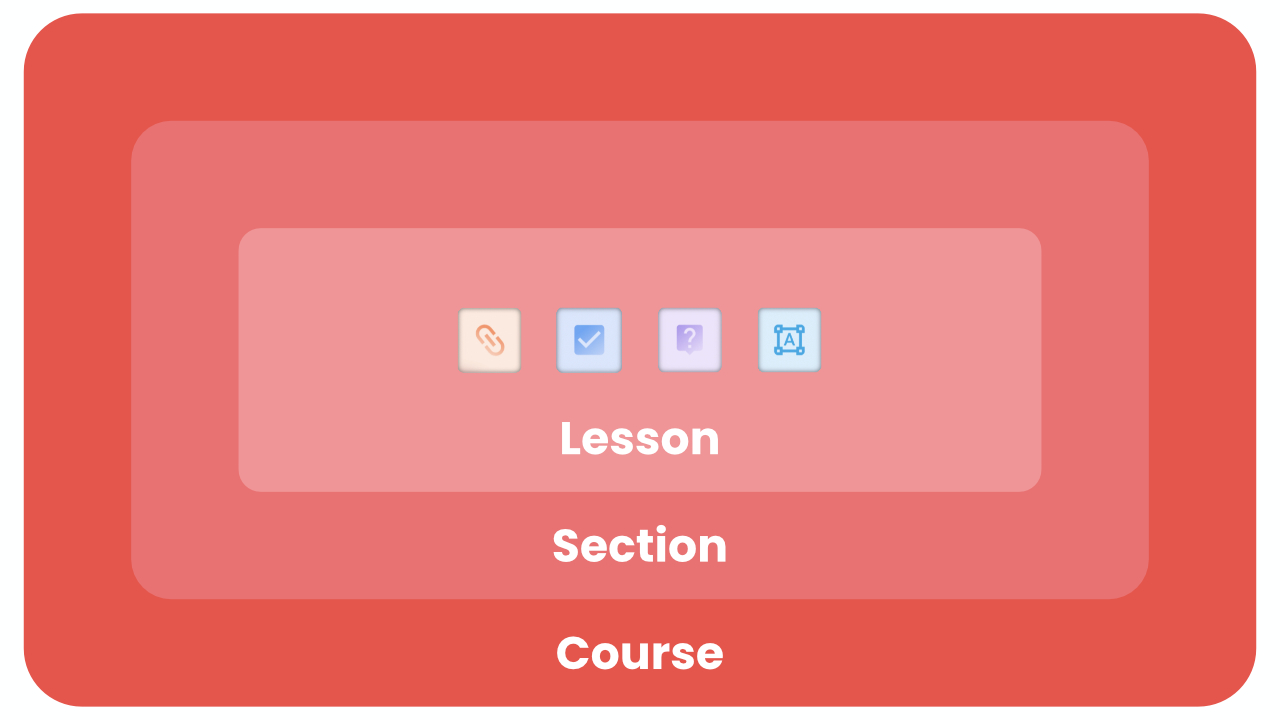
Your course contains → course sections, which contain → lessons, which contain → action steps to complete
Write your course outline
By using your course structure as a foundation, you can create your course outline.
When doing it, keep in mind that:
- Each section should not only cover one main topic, but also focus on one main action, so each lesson builds further on the same skills and knowledge. At the end of each section, your student should feel that they are one big step closer to their ultimate goal.
- Each lesson is about a single concept or big idea, if you have several related ideas, you can just break them into a sequence of lessons. Those perform much better than gigantic mega-lessons.
- We recommend having 5 to 10 lessons per section, if you end up adding 25 lessons to a section, could it possibly be split in two?
Write your course content
When you are writing your course's contents, you don’t need to write down every single word you will say. This takes WAY longer than just writing bullet points, and it’s hard to not be boring when reading a script word-for-word.
It shouldn’t take too much time to write.
Writing a mini-course can be done in a few hours by using your existing notes and knowledge about the topic you want to teach.
And for longer courses, if you are spending around 2 hours a day on writing a section's contents, it shouldn’t take you more than 5 days per section. If you think that it will take you more than 5 days, maybe you can split this section to make it easier for you.
Create your course resources
How much time it will take to create your course resources will entirely depend on what you want to create, but usually try to not take longer than 1 hour per resource.
Create your course slides
The sweet spot of length for each lesson is between 10 and 20 slides, which will get you a lesson that lasts between 5 and 20 minutes. Keep that in mind while writing your lessons to ensure that following them will be an enjoyable experience.
Step 3: How long does it take to film your course videos?
With all of your course contents ready, you can finally record your lessons!
For longer-form courses, we recommend batching your filming process as it will allow you to work faster.
How much time does it take:
- For a Mini course, it can take a few hours.
- For a Targeted course, it can take up to a few days.
- For a Flagship course, it can take up to a week.
To film your course, you will have to:
Get your gear and set it up
We recommend keeping it simple, and not getting gear that is too fancy, especially if you are creating your first course.
There are 5 main things you need to create your videos:
- Sound
- Lighting
- Camera
- Recording software
- Editing Software
For any kind of course, setting up your gear is done in less than a few hours.
We have a list of recommendations on this page if you still need one of these.
Record it (obviously)
Here are some tips to be the best presenter you can be:
- Make sure everything works before you start recording
You don’t want to start recording, and realize that your microphone wasn’t picking up the sound properly after 2 hours of recording (believe me, I’ve been there). - Avoid reading your text or slides
The slides are here to give you structure, and help your students follow along. No need to read them word for word. - Be energetic
It’s obviously much more exciting to follow a course from someone who has great energy. If it helps, you can film after drinking a cup of coffee! - Avoid saying “Um” and “Ah”
Saying these too much can make you sound unsure of yourself, and it can make your editing more tedious. It is actually better to just leave a silent pause: you can edit it out later, whereas “ums” and “ahs” can be tough to remove from the middle of a sentence. - It doesn’t need to be perfect
You can always change your course material or a video that you don’t like if you’re really not happy with it. Don’t fall into the trap of perfectionism or try to record the same lesson over and over, especially if that’s your first course.
Once you finish recording your videos, you should have the audio and video files that you need for editing your lesson.
Step 4: How long does it take to edit your course videos?
Depending on the editing quality you want out of your course, the answer will be different.
But most courses keep it simple in terms of editing, except if you are in a visual-heavy field like graphic design or filmmaking because your audience would expect higher quality editing.
For example, editing a dozen 10-minute lessons of an SEO course can take around 2-3 hours, while doing the same amount of lessons in the filmmaking space can take a few days or even a full week.
But usually, most online courses simply use a screen capture and the creator’s face.
How much time does it take for this kind of format:
- For a Mini course, it can take a few hours.
- For a Targeted course, it can take up to a few days.
- For a Flagship course, it can take up to a few weeks.
If you want to edit your courses yourself, you can use this free checklist that I created for you!
But you can also work with a freelance video editor to get some help, as it is a pretty tedious task.
Step 5: How long does it take to publish an online course?
On most course platforms, setting up your online school and uploading your videos shouldn’t take very long.
How much time does it take:
- For a Mini course, it can take a few minutes.
- For a Targeted course, it can take up to a few hours.
- For a Flagship course, it can take up to a few days.
I documented the process of publishing your online course to SchoolMaker in our course creation guide if you’re interested!
Step 6: How long does it take to market an online course?
This step can vary a lot too, but it usually takes less than a week to create a solid sales page, and only a few hours to create a very simple one and connect it to your online course platform.
How much time does it take:
- For a Mini course, it can take a few hours.
- For a Targeted course, it can take a few days.
- For a Flagship course, it can take a few days.
To promote your course efficiently, you will have to:
Create a sales page
If you’re creating your first course or if you don’t have a dedicated team yet, we recommend not overcomplicating your sales page.
Here is a simple sales page outline you can use to sell your online course:
- Hook
- Problem
- Solution
- Results
- Explanation of the pre-launch concept
- What you will receive
- Credibility and Social Proof
- Satisfaction Guarantee
- The cost of inaction
- FAQ
- Contact
We call it “the 80/20 sales page” after the famous pareto principle, which states that 80% of your efforts come from 20% of your effort. And indeed, this simple structure should take you 80% of the way.
You can learn more about it in our course creation guide.
Drive traffic to your sales page
To do so, you can use all the marketing assets you have like an email list, social media audience, or knowledge about paid ads.
Depending on how complex you want this to be, it can take from a few hours to a few days of preparation.
What to do next
If you’re about to start creating an online course, we’ve created a complete guide that goes over each step of the course creation process, and much more!
In this guide, you’ll learn how to create online courses that:
- Stand out from your competitors
Most courses are information dumps, but you can create courses that actually help your students go from point A to point B and guarantee them tangible progress. - Are community-based
Communities can change people’s lives and turn them into your best ambassadors, which leads to more sales. - Establish your expertise in your field
By crafting a course that provides insights and value to people in your field, which can lead to more opportunities.
If you’re creating your first course, you’ll learn how to do an awesome job on your first try.
Or if you already have some courses, I’ll show you how to take them to the next level.
Click on the book to get access to the free guide.👇


