


<p class="tip">Click here to get to the templates directly</p>
Making your outline is one of the first steps you will have to go through if you want to create an online course. More people are looking high-quality courses nowadays, especially when it comes to picking up new skills.
By creating an effective online course that brings results to your students, you can promote yourself as an authority in your domain, build a network of like-minded individuals around topics you care about, and increase your reach online.
By using the steps in this ultimate guide and our template, you'll be able to create an effective course outline easily.
So let's start with how to create an online course outline.
What is an online course outline?
To know how to create an online course outline, you should first know what an online course outline is. A course outline is an overview of the knowledge you'll cover in your course. It indicates your student's starting point and their finishing point. All of the significant steps they will take are also listed.
Effective online courses are action-oriented, and this is why I recommend setting clear objectives while avoiding to fall into the following traps when writing the outline of your course content:
- Too much theory and concepts without concrete examples
- Sections or lessons with no specific objective for the student
If we zoom out of an online course, we see that it is divided into several parts:
Your course contains → course sections, which contain → lessons which contain → action steps to complete by your students.
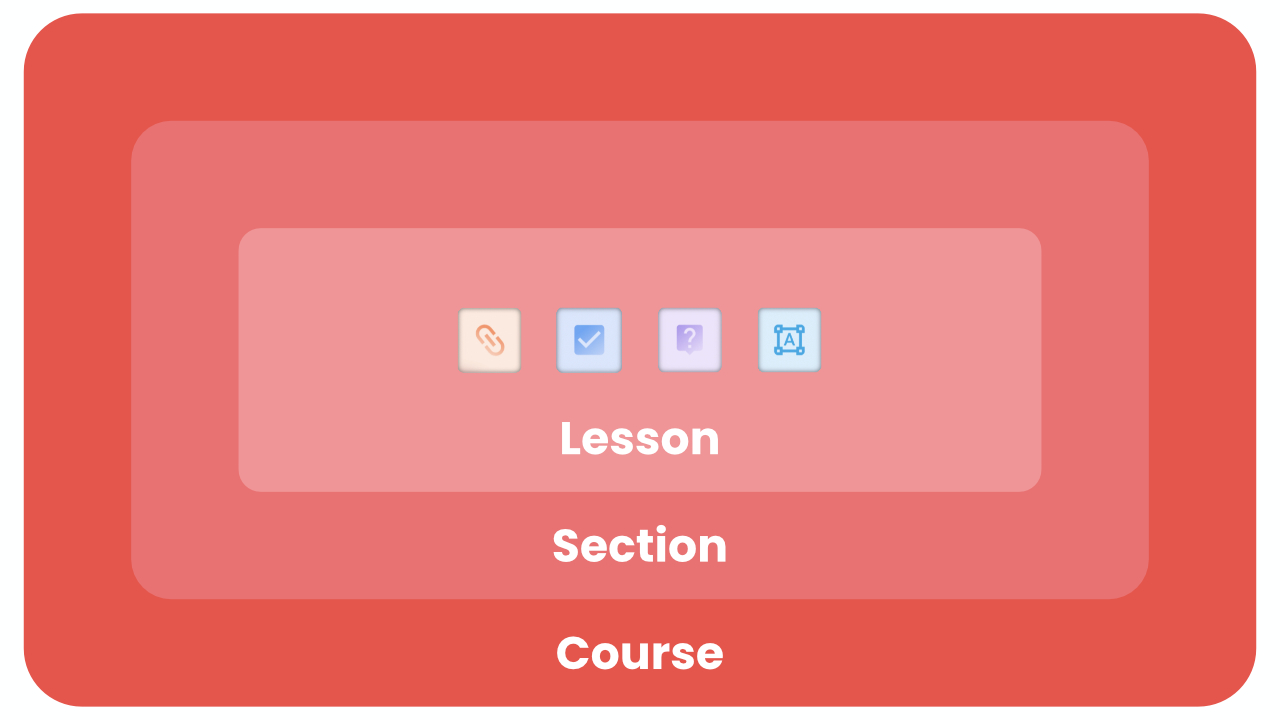
Because sections, lessons, and steps are the fundamental components of your course, they will make up the main structure of your outline. You can use these as your fundamental building blocks and then build on top of them to go deeper into each subject.
Why it's important to create a course outline?
Your ideas are more organized when you write a course outline, which leads your course creation process to be easier for your students. By using an outline, you can group the subjects you want to cover in your course in a way that makes sense to your students.
It's also be helpful to write down the topics you intend to cover first. This is because writing a course outline will help you get deeper and a richer course structure.
When you take the time to write the outline for your online course, you can also know what your course requirements will be before writing it. For example, you might need to create templates, quizzes, or resources to help your students reach their learning goals, and writing a course outline helps all of this be clearer.
In short, starting with an outline will speed up the process of creating your online course.
What should a course outline contain?
The following elements should be included in your outline if you want to create a great course:
- Include the name of your course in your outline.
- Course description: Describe your course and what people will learn after completing it.
- Include your course sections.
- Lessons: Write down each lesson you'll include in each section.
- Steps: For each lesson, think of what your students should actually do to get closer to getting results.
- Include a list of resources you want to include in your lessons.
Now we know that it is very important to create your course outline before starting to actually write your course contents, let's now look at 4 tips on how to create a successful course outline.
What should you do before you create an online course outline?
1. Pick the general topic you want to focus on
Anything from web design to a baking is fair game as a general topic choice; it's entirely up to you, and the options are practically endless.
I recommend choosing a general topic that appeals to both you and your audience, which will make your online course creation process more enjoyable. You should choose a subject for your online course that you are either already knowledgeable about or eager to learn in-depth.
Consider what you do best and the topics on which people seek your advice via DMs or in your comment section. Those subjects typically result in the most successful online courses.
2. Choose who you want to help and niche down
It’s important to choose who your future students will be and what their goals are so you can create a better learning outcome for them with your course.
Having a more targeted approach is better because if your course target audience is too broad, it might end up not being relevant to anyone.
If you were an ecommerce site owner trying to make more sales with Facebook ads, what course would you rather buy:
- A course that helps anyone learn online marketing.
- A course that helps anyone learn paid ads.
- A course that helps ecommerce site owners create successful Facebook ads campaignes to make more sales.
It’s obviously the last one.
As a creator, you probably already have a few online course ideas thanks to people in your audience who ask you questions by email, in comments or DMs.
But before jumping into your notes app to write the outline of the course, you need to define for WHO your course is going to be as precisely as possible by creating an Ideal Student Persona (ISP). An ISP is a fictional person representing a key segment of your audience which is more likely to buy a product from you.
Here's a template from our completely free course creation guide that you can use to create an ISP.
3. Validate your course idea
Running a test before you start writing your outline will allow you to validate if the course idea you have will be viable in the long run. It's important to do this first because creating a course requires a lot of your time and effort, so it's better to first know what to actually include in your course.
You have 3 ways test your idea:
- Asking your audience to participate in polls or online forms.
- Creating a brief tutorial first and see how well it does with your audience.
- Get a dozen people to be beta-students so you can coach them and help them become better in the topic you want to create a coursa about.
Ask the people you interact with if they're interested in seeing more of this kind of content.
4. Conduct market research on the topic you chose
Doing market research before creating your course outline is very important. It doesn't matter if you're already an expert in your field or you want to learn it from scratch; right now is the time to dive in and learn everything there is to know. Go beyond what course participants can quickly find in search results as part of your in-depth learning process.
If you find other online courses that address the same subject and they're doing well, then it's a positive indicator.
Competition shows that people are interested in and find value in this kind of course.
Once you've determined your target audience and validated your course idea, you're ready to go to the next step, and conduct market research.
Find a variety of sources on the subject, from literature to competitor's courses, and use your past experiences. By conducting keyword research and Google, find out what kinds of questions people are searching for around your target topic. This can help you better understand the kinds of inquiries that your audience would find interesting, and which ones you can answer when you will make the course syllabus.
Watch out for any subcategories that may exist in your niche. For instance, if you want to teach a course on how to care for indoor plants, you'll want to cover the fundamentals like water and natural light. But to add value, look for original angles to broaden the course's focus, such as the different kinds of air-purifying plants.
Now, you should be able to choose the problem you want to solve with your course, and you're ready to create your outline.
How to create an effective course outline? [Templates]
Once you've chosen your course topic and you've decided what problem to solve with your course, it's time to outline your online course material.
You can follow these 3 steps, each with an outline template, and outline example to do so:
Step 1: Plan your course sections
You should clearly understand the before and after for your course students before you start outlining your course. If you reverse engineer this "transformation", you will get the sections of your course.
Ideally, each section should focus on building the same skill, with each lesson building upon it. At the end of each section, your student should feel that they are one big step closer to their ultimate goal.
In terms of structure, this is pretty simple, I created a template for the introduction of each section, as well as for how you should arrange your lessons in your sections:
Course section introduction outline template
- What the section will cover
Give a quick overview of the section’s contents. - Why is learning this important?
Instead of just telling your students why something is important, you can use storytelling to make it more engaging and relatable. - Why are they learning it right now, and what are the goals of this section?
Think of where they are in their learning journey, and where you want them to be by the end of the section. - What should they know before getting started, and which tools do they need?
Help your students set up the right environment for learning and getting results. - Manage expectations
Clarify what your students should expect out of this section by remaining realistic and encouraging. You can also give them warnings and important notes about the topics you will cover.
Course section content outline template
- Each lesson is about a single concept or big idea
If you have several related ideas, you can just break them into a sequence of lessons. Those perform much better than gigantic mega-lessons. - We recommend having 5 to 10 lessons per section
In the same way as above, if your section has 25 lessons, could it possibly be split in two? - Let your students celebrate their wins
By encouraging them to share their results in a community, by congratulating them on their progress or by simply helping them realize the progress they made in a satisfying way.
For example, you could ask your students to practice the skill you are teaching, and compare their current performance with the one they had at the beginning of the course.
Step 2: Outline your course lessons
Separating a module into into smaller chunks or is important to create an engaging online course. You should essentially follow the same procedure for each lesson once you have your sections organized.
Course lessons outline template
- Today’s lesson will cover
Quickly present the lesson and its contents - Managing expectations
Clarify what your students should expect out of this lesson by remaining realistic and encouraging. You can also give them warnings and important notes about the topics you are about to cover. This can be the moment to use parts of your story that mirror your student’s journey. - The What
Present the concept or big idea of this lesson. - The Why
Explain why it's important, and why they’re learning it now. - The How
How to do it (you can use a tutorial, demonstration, procedure, provide an action plan, etc.). - Examples
Illustrate with different examples (corresponding to the different situations they might encounter) - What if
What are the common mistakes to avoid, and what are their consequences? - Conclusion & Summary
Provide a recap of what they just learned, and summarize the key points of the lesson.
After the learning phase comes the most important part (which, sadly, most course creators completely forget about): getting your student to take action.
Step 3: Add steps to complete for each lesson
Each lesson should end with some kind of action step for your student.

Here are a few examples:
- Check out a resource
Additional resources can help your students progress faster. - Apply what they just learned through assignments or tasks
This is the best way to help your students make progress, they learn by doing! - Complete a quiz
Quizzes allow you to see if your students understood the lesson correctly, and help them remember what you taught them. - Answer a question in a text prompt, which allows them to better internalize new knowledge and show that they understand what they just learned.
- Share their progress, ask feedback, or help someone in the community
Interacting with other students in the community will help your students feel part of a supportive group, and it will encourage peer to peer learning.
With our course builder SchoolMaker, the action and learning phases are seamlessly integrated because you can add different kinds of “steps” to complete before moving on to the next lesson.

Conclusion
Now that you've mastered the art of online course outline creation, you can now start building your course. If you want to dive deeper in this topic, I highly recommend our entirely free course creation guide, which you can start reading by clicking on the book below.👇


